Security Cameras
I live in a ground floor apartment, and want to keep an eye on the space and the cats when I am away. A search for security camera systems that offered timelapse recording, livestream viewing, and instrusion notifications was unsatisfactory. Most consumer systems were either too expensive, had security shortcomings, or lacked sufficient user control. As a result, I endend up assembling a system that meets most of my needs.
The solution I've settled on uses three Raspberry Pi's, each acting as a server connected to a generic fisheye USB camera. A mix of open-source software and scripts provides a password protected livestream served over HTTPS, timelapse recording, motion and object detection, notifications, and remote storage.
The cameras come with limitations and vulnerabilties, some shared with consumer solutions, others unique to a home-brewed setup. But for my needs, they have worked well, and I have appreciate their modularity, the ability to repurpose hardware, and full control over the system and the data that it generates.
I was surprised by how quickly I could stand up a system of such disparate parts — in terms of hardware and software — while writing little code of my own. Putting these cameras together seemed to confirm some of the UNIX principles. It's been possible to connect components with just a few scripts as glue.
Any code referenced on this page should be available here: https://code.dwrz.net/vigil/. I don't intend to keep code on this page up to date; it should only be used for example and inspiration.
What follows is a rough guide covering the basic components of the system. It is not intended to be a step-by-step guide, though there is a chance it might work as one.
Hardware
I've opted for the following:
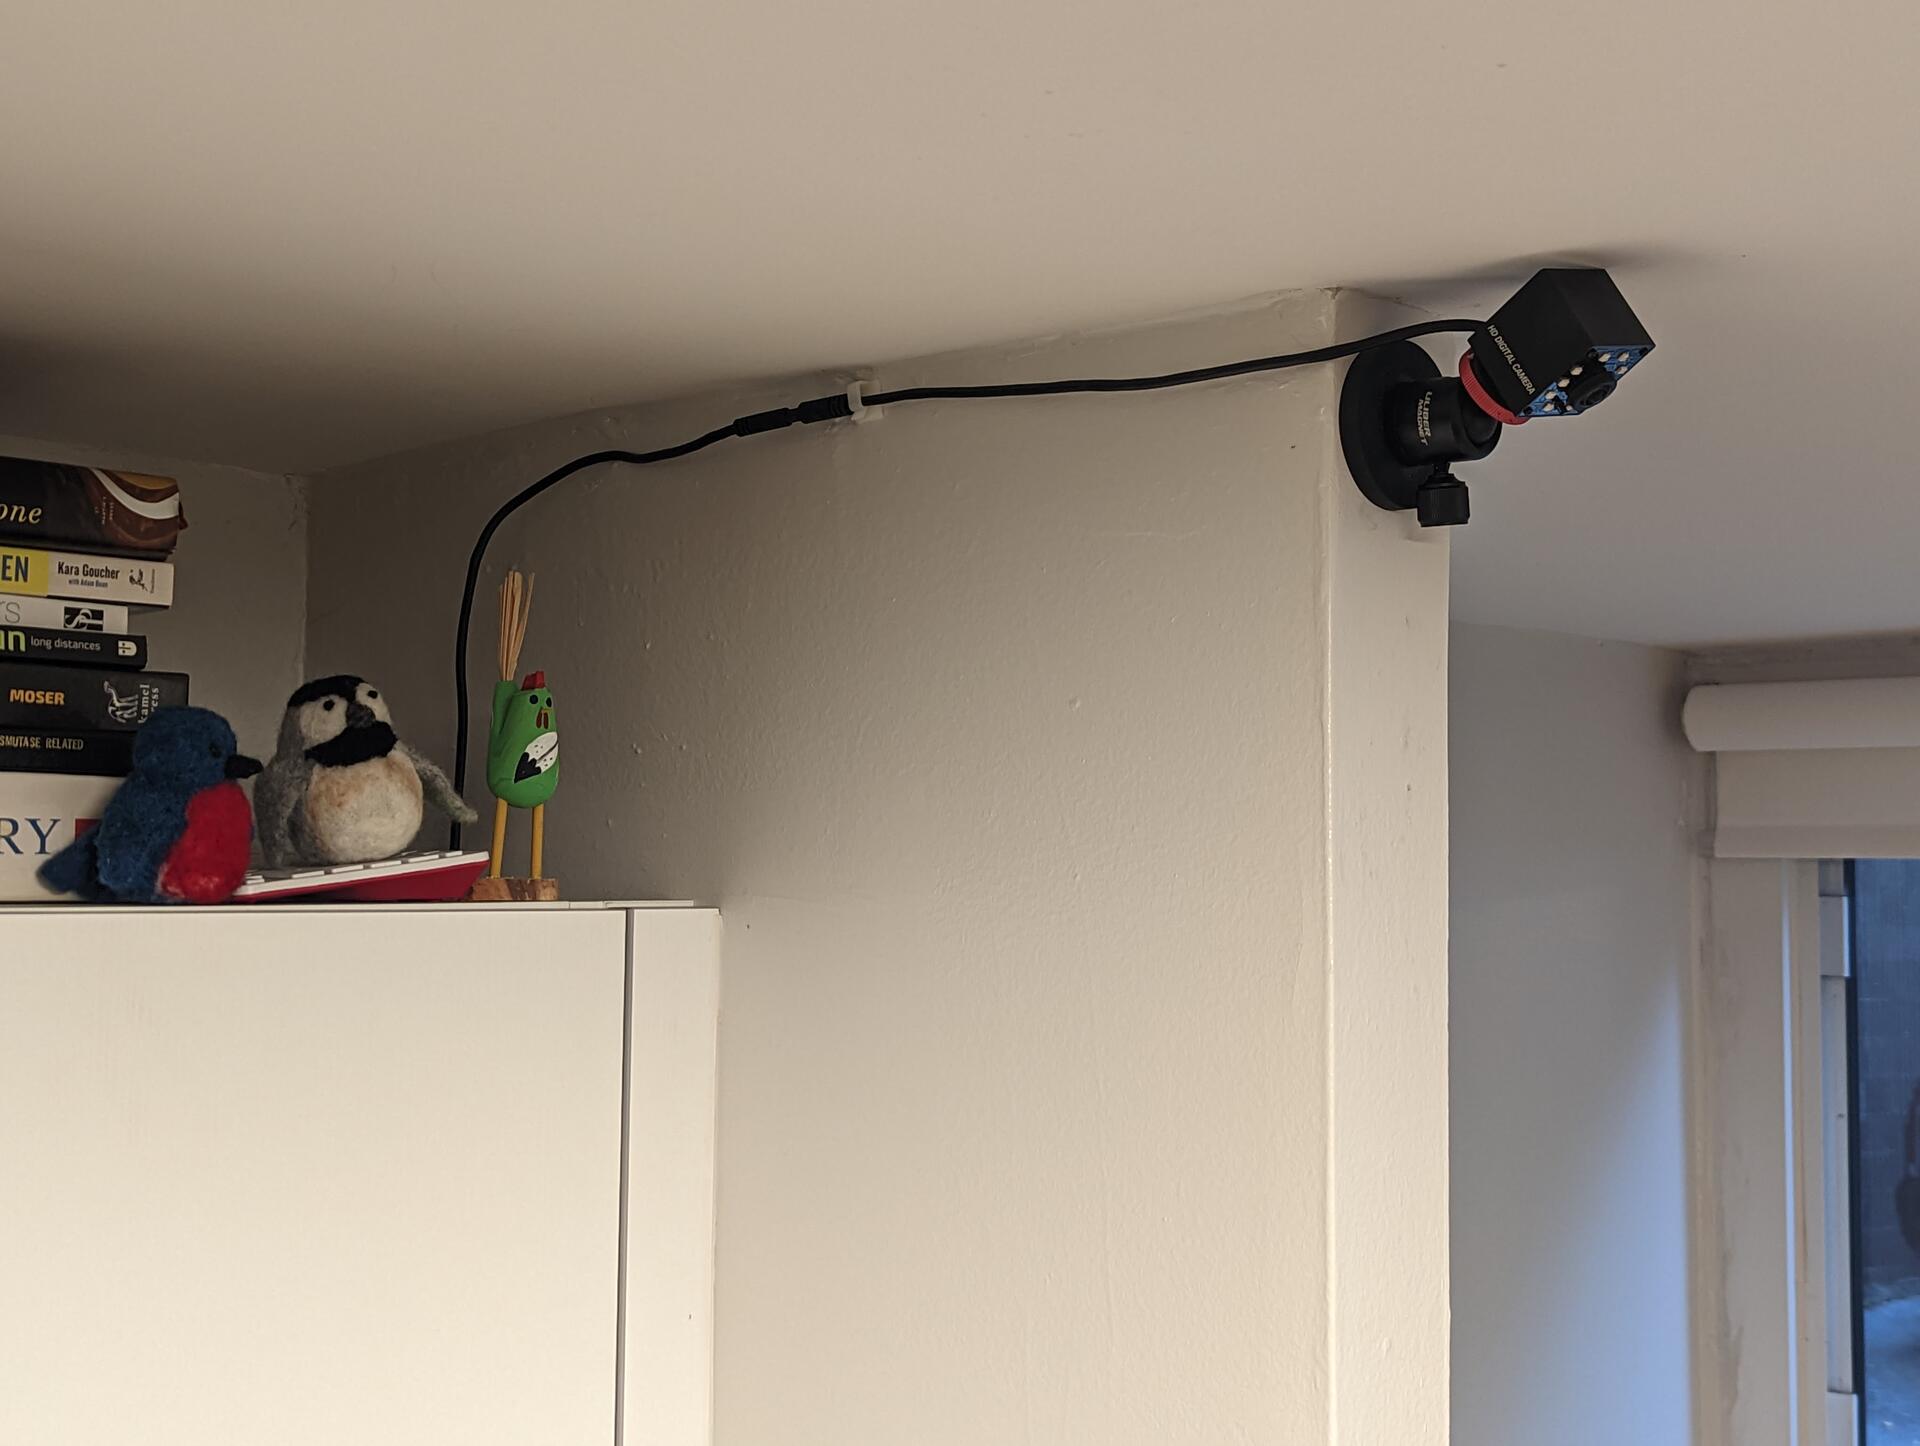
- Raspberry Pi 400 — easier to source and repurpose for my use cases. I would have preferred a smaller device with more open hardware and USB ports, but it was hard to find anything of comparable price.
- Sandisk SSD Flash Drive — improves performance and reliability compared to running the Raspberry Pi off of a MicroSD card.
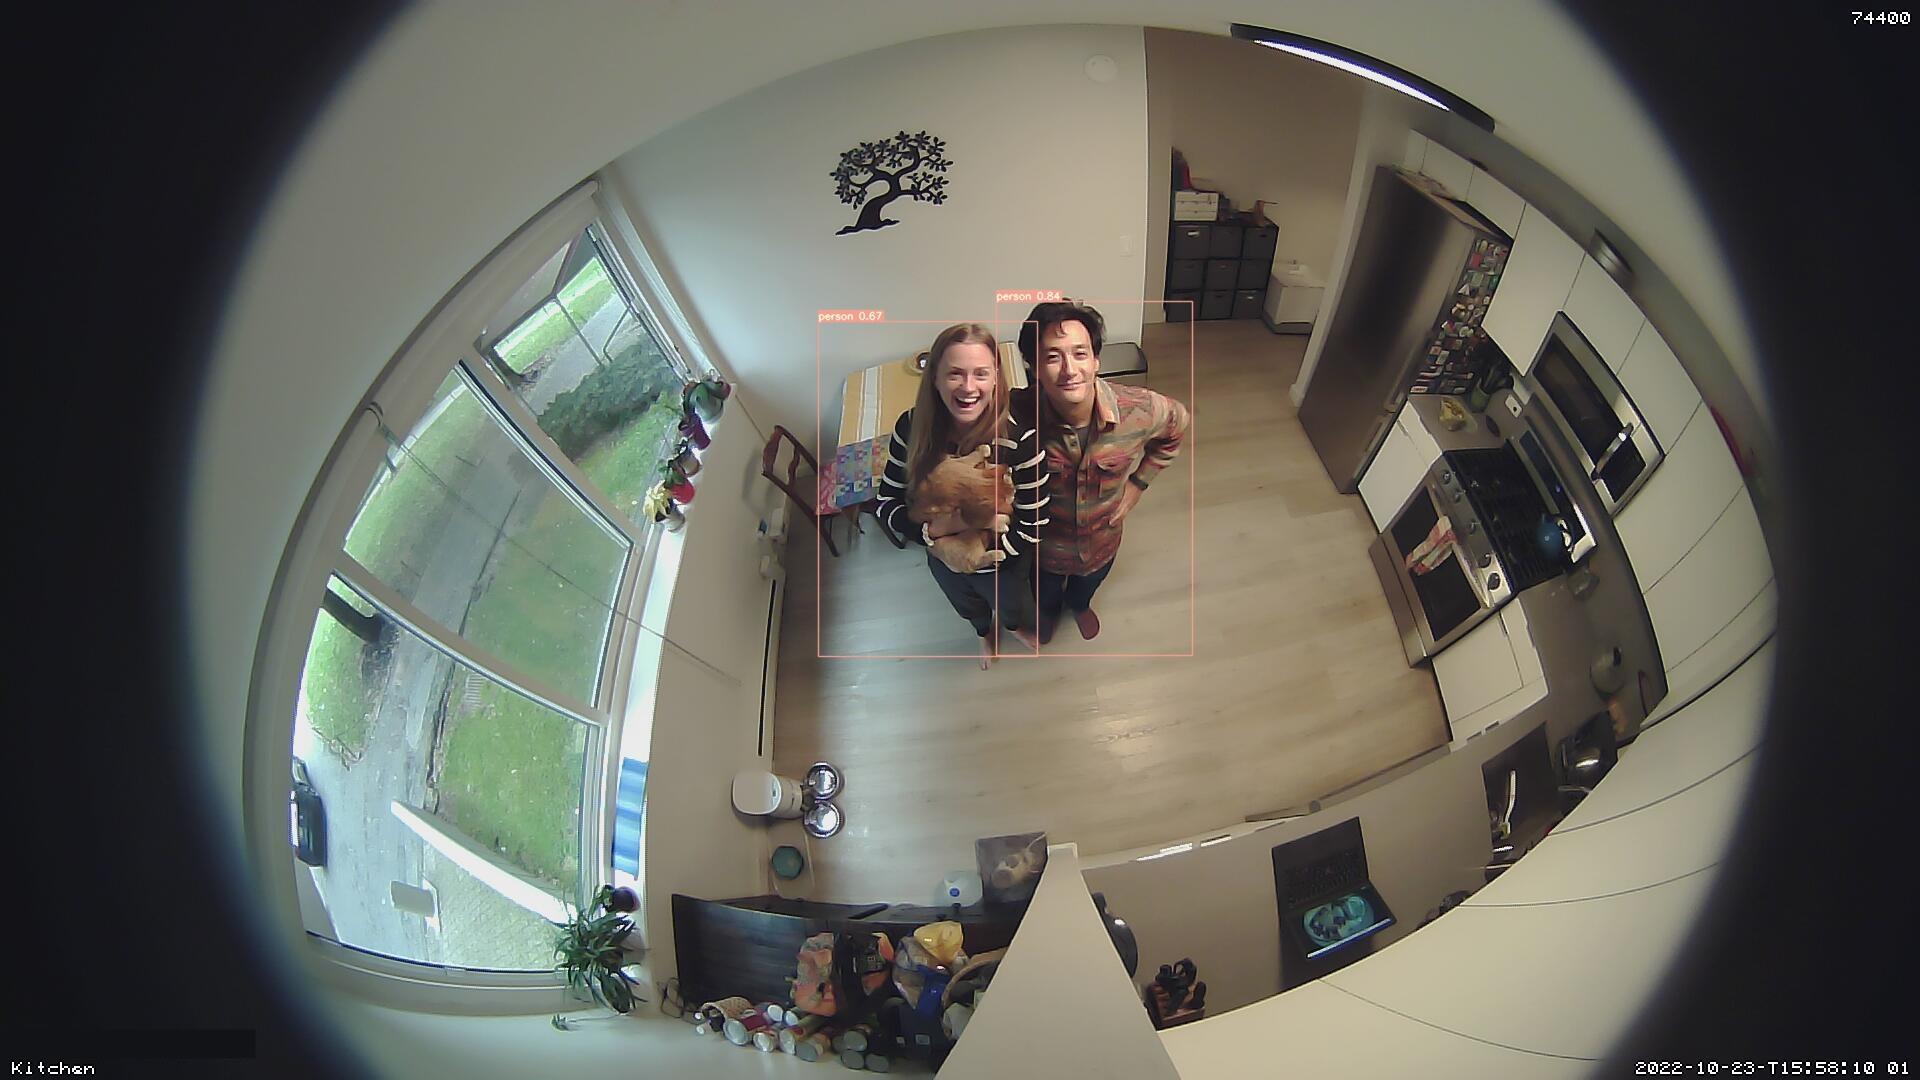
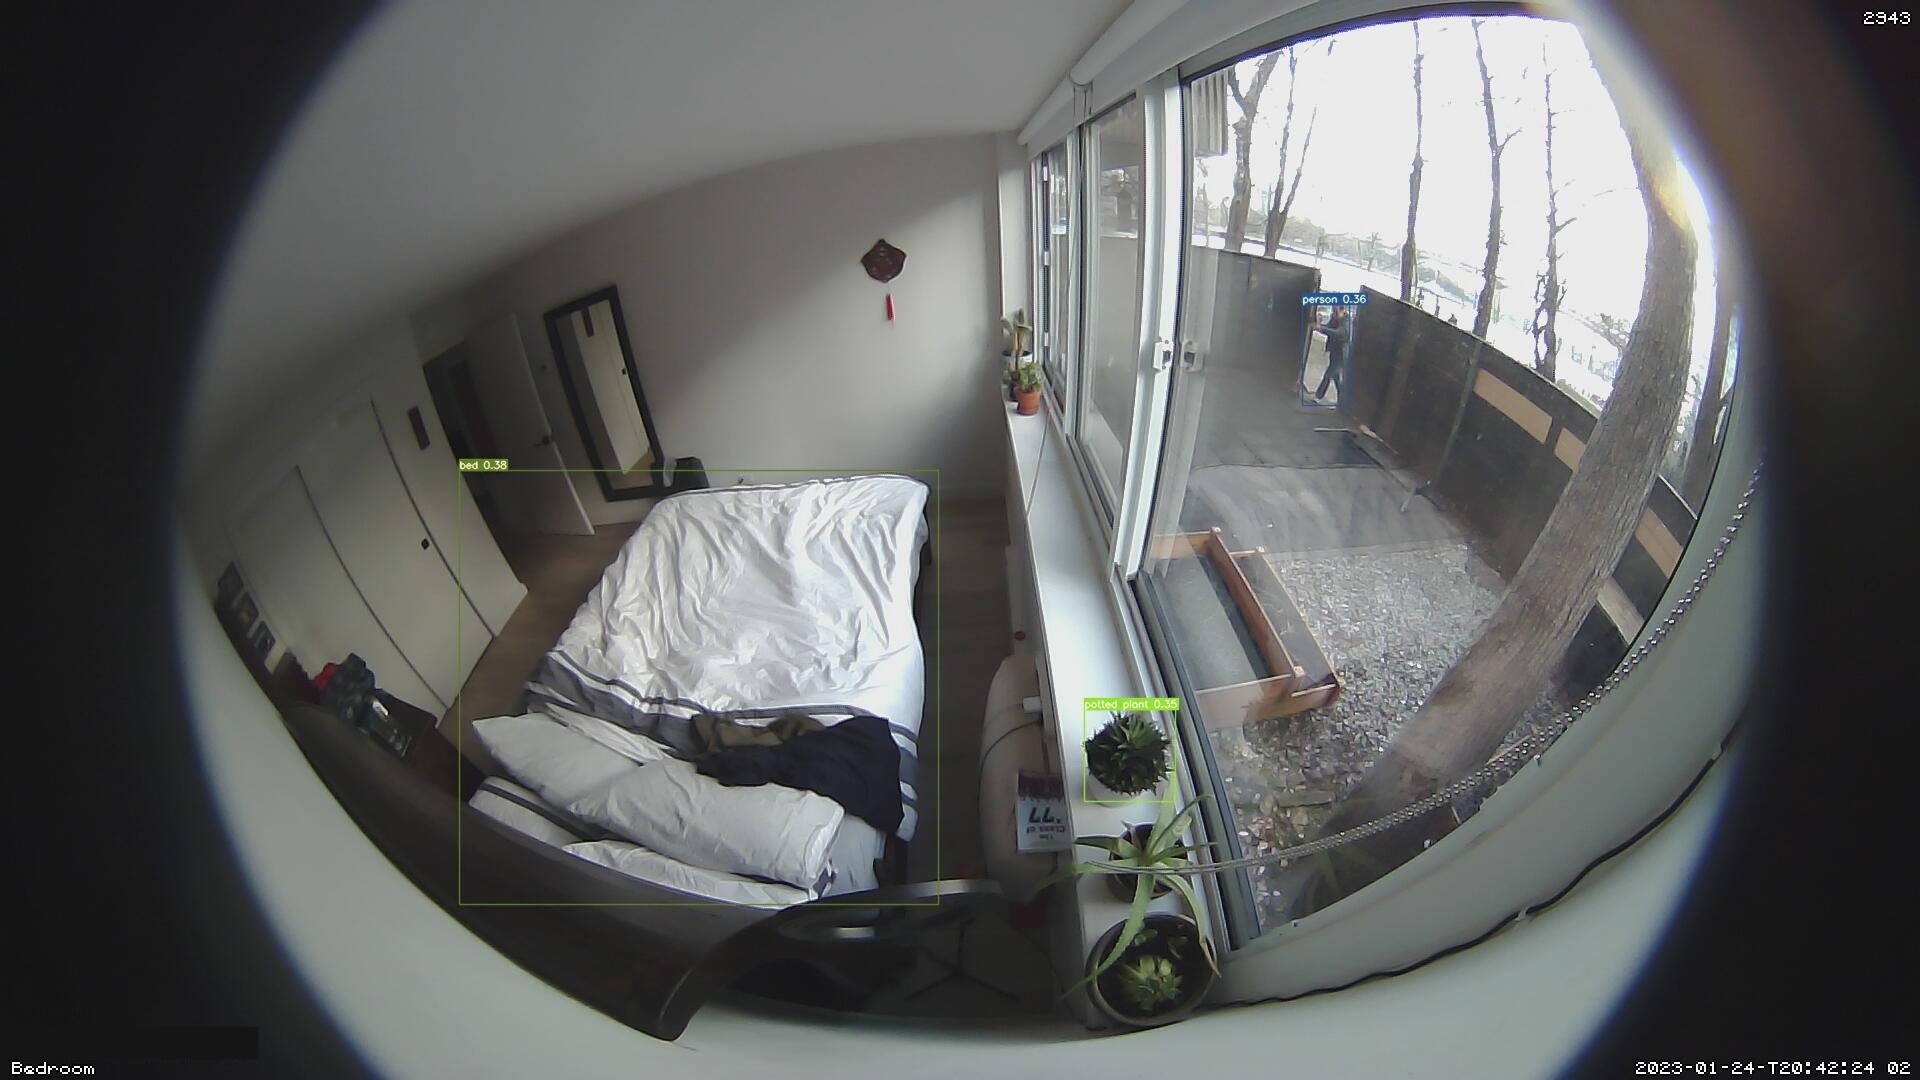
- ELP 3.6mm FHD 180° IR Fisheye Camera — can cover an entire room and see in the dark.
- ULIBERMAGNET Tripod Ball Head with Magnetic Base — used to hold and position the cameras.
Server

I've used the default operating system for Raspberry Pi's, Raspberry Pi OS, and this guide assumes that context. I won't cover the operating system installation and setup of an administrative user — documentation is available elsewhere.
You should be mindful of the security of the servers themselves. This is a problem that even commercial offerings have not handled well. Your personal circumstances will dictate the balance of features and security.
Once you are up and running with Raspberry Pi OS, ensure you are using the latest software and security updates:
$ sudo apt-get -y update && sudo apt-get -y dist-upgradeInstall any dependencies necessary to get work done, e.g.:
$ sudo apt-get install curl git mgConsider enabling unattended security upgrades:
$ sudo apt-get install unattended-upgrades apt-listchanges
To receive email reports for unattended upgrades, a
Message Transfer Agent
(MTA) and the mailx command are required. This guide
assumes the use of msmtp:
$ sudo apt-get install bsd-mailx msmtp msmtp-mta
Setup the msmtp
configuration
file for the root user:
$ sudo mg /root/.msmtprcdefaults
auth on
tls on
tls_trust_file /etc/ssl/certs/ca-certificates.crt
logfile /root/.msmtp.log
account gmail
host smtp.gmail.com
port 587
from user@example.com
user user@example.com
password ${PASSWORD}
# Alternatively, a command may be used to retrieve the password:
# passwordeval pass google/gmail/app
# See: https://marlam.de/msmtp/msmtp.html#passwordeval.
account default : gmailThis configuration assumes a Gmail or Google Workspace account; you will need to specify appropriate settings for your own mail provider. If you are using Gmail or Google Workspaces, you will need to set up an "app password" for programmatic access.
Test that msmtp is working:
echo "Test" | mailx -s "Test" user@example.com
Edit the unattended-upgrades configuration to send email
notifications:
$ sudo mg /etc/apt/apt.conf.d/50unattended-upgradesUnattended-Upgrade::Mail "user@example.com";Networking
I assign a static IP address for each of
my servers. Most consumer routers allow for this in their web interface; I
have something like the following in my router's /etc/dhcpd.conf:
host kitchen {
	fixed-address 10.0.1.101;
	hardware ethernet de:ad:be:ef:8d:8e;
}
Set up a firewall; I block all ports by default, and at most leave three ports
open: one for SSH, one for the camera livestream (e.g.,
3000), and optionally one for the web interface (e.g.,
8080).
If you intend to share the livestream over the internet, you'll need a relay or a port forward from your router. Depending on your network setup, you may need to enable hairpin NAT or split-horizon DNS to access the servers by their domain name when on the local network.
SSH
Create an SSH keypair:
ssh-keygen -t ed25519Then, copy the public key to the server:
ssh-copy-id -i ${SSH_KEY_PATH} username@10.0.1.101 Add the server to your SSH config:
Host kitchen
	Hostname 10.0.1.101
	IdentityFile ~/.ssh/keys/kitchen
On the server, disable root login and password authentication; enable public key authentication.
$ sudo mg /etc/ssh/sshd_configPermitRootLogin no
PubkeyAuthentication yes
PasswordAuthentication noRestart the SSH daemon:
$ systemctl restart sshdMotion
motion provides
the core features of the system — multiple cameras, live streams, web
control, motion detection, saving images and movies, timelapse, and event
triggers. Install it:
$ sudo apt-get install motion
On Raspberry Pi OS, the installation will create a
motion user, homed at /var/lib/motion/. The
configuration file for motion is located at
/etc/motion/motion.conf; the systemd unit file is
/usr/lib/systemd/system/motion.service.
motion's behavior is controlled via its configuration file. The
documentation
covers the settings, and should be reviewed; situation will dictate which
values to use. I discuss configuration below, after setting up the other
components of the system.
Object Detection
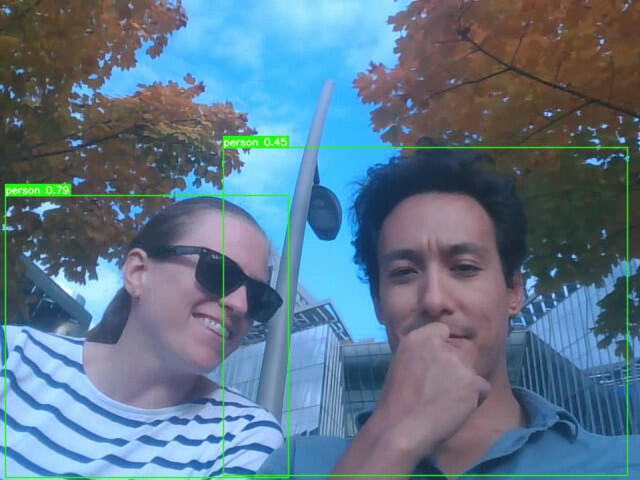
yolov7
provides the object detection functionality. I use the "tiny" weights for
faster processing on a Raspberry Pi. On a Raspberry Pi 400, I typically see
inferences complete under a second.
$ sudo apt-get install git pip
$ sudo -u motion bash
$ git clone https://github.com/WongKinYiu/yolov7.git
$ cd yolov7/
$ pip install -r requirements.txt
$ wget https://github.com/WongKinYiu/yolov7/releases/download/v0.1/yolov7-tiny.pt
$ mkdir -p /tmp/yolov7/
AWS Rekognition can be used
as an alternative to yolov7. I had better — and cheaper —
results with yolov7. However, if you encounter any issues with
the yolov7 installation, AWS offers a convenient fallback.
To use Rekognition, you will need to setup an AWS account, install the
aws CLI, and ideally, create an IAM user with permissions
restricted to the Rekognition service. You will also need to
install jq to
parse the JSON response from AWS.
$ sudo apt-get install jq
$ pip3 install --system awscli
$ sudo -u motion bash
$ aws configure
Notifications
I've set things up so that notifications are only sent when two smartphones are not reachable on the network. The upside is less notifications (though they'll sometimes come through if the device goes to sleep). If you go this route, you'll need need to set up static IP addresses for your devices, and remember to take them with you.
I send SMS notifications by emailing my mobile phone number, setting the
recipient to something like 1234567890@msg.fi.google.com. That
option may not be available depending on your mobile service provider. A
fallback would be to send notifications to an email address, or to use a
service like Twilio or
AWS SNS.
I include the object-detected camera snapshot in notifications. While it's
not too difficult to write a script or simple program to compose
MIME
emails, it's easier to just install
mutt.
$ sudo apt-get install mutt
Configure msmtp and mutt for the motion
user:
$ sudo -u motion bash
$ cd ~
$ mg .msmtprc
defaults
auth on
tls on
tls_trust_file /etc/ssl/certs/ca-certificates.crt
logfile ~/.cache/msmtp.log
account gmail
host smtp.gmail.com
port 587
from user@example.com
user user@example.com
password ${PASSWORD}
account default : gmail$ chmod 600 .msmtprc
$ mg .muttrcset sendmail="/usr/bin/msmtp"
set use_from=yes
set from=user@example.comExporting Data
I've configured the system to delete snapshots after sending the corresponding notification. This makes it harder to retrieve data if someone gains access to the server. However, since I want to be able to review past snapshots and timelapse footage, I backup the data off the servers.
There are several options — rsync or scp files to
a remote server, perhaps one with an encrypted drive. Additionally, or
alternatively, the files can be backed up to the cloud, to a service like
AWS S3 or Backblaze B2.
For b2, I took the following steps:
- Create an account.
- Create a bucket.
- Setup lifecycle rules on the bucket to delete files after a certain number of days.
- Create an application key.
On the servers, I install and configure the b2 CLI.
$ sudo apt-get install backblaze-b2
$ sudo -u motion bash
$ backblaze-b2 authorize-account
DDNS
To make the camera stream available remotely and conveniently — without a
VPN, port forwarding, or dealing with IP addresses — I use
subdomains to reach my cameras. You will need your own domain for similar
functionality.
I don't have a static IP from my ISP, so I use Dynamic DNS to keep my
subdomain records updated. A systemd timer regularly runs a
script to update the A and/or AAAA records for the
server's subdomain.
The public IP of the server is retrieved with a DNS lookup, using
dig. On Raspberry Pi OS, you'll need to install the
dnsutils package:
$ sudo apt-get intsall dnsutils
How you update your records will depend on your registrar. I use
AWS Route53, and a simple Go
program I wrote called
r53, which wraps around the
AWS Go SDK and
dig.
A script is probably easier to install. The following isn't as full featured
as r53, but it doesn't require compiling and installing a Go
binary:
#!/usr/bin/env bash

readonly HZ="${AWS_HOSTED_ZONE}"
readonly DOMAIN="${HOSTNAME}"

err() {
  echo "[$(date -u +'%Y-%m-%dT%H:%M:%S%:z')]: $*" >&2
}

main() {
  if ! [[ -x "$(command -v aws)" ]]; then
    err "aws cli not installed"; exit 1
  fi

  # Get the IP address.
  ip="$(dig -4 +short myip.opendns.com @resolver1.opendns.com)"
  if [[ -z "${ip}" ]]; then
    err "failed to get ip address"; exit 2
  fi
  printf "ip: %s\n" "${ip}"

  # Update the domains.
  update='{
  "Comment": "DDNS",
  "Changes": [
   {
     "Action": "UPSERT",
     "ResourceRecordSet": {
       "Name": "'"${DOMAIN}"'",
       "Type": "A",
       "TTL": 300,
       "ResourceRecords": [{ "Value": "'"${ip}"'" }]
     }
   }
 ]
}'

  printf "requesting update for %s\n" "${DOMAIN}"
  aws route53 change-resource-record-sets \
      --hosted-zone-id "${HZ}" \
      --change-batch "${update}"
}

main "$@"
If you are using AWS Route53, you'll need to install and setup the aws CLI for whichever user will run the DDNS service. Again, it's best to create an AWS IAM user with permissions limited to Route53.
$ pip3 install --system awscli
$ sudo su
# aws configure
scp the script or the r53 binary to the server,
then move it and set appropriate permissions:
$ scp r53 user@server
$ sudo mv r53 /usr/local/bin/
$ sudo chmod 755 /usr/local/bin/r53
Test the command to ensure that it works:
$ r53 $HOSTNAME
These are the systemd unit and timer files — install them at
/usr/lib/systemd/system/:
[Unit]
Description=DDNS
RefuseManualStart=no
RefuseManualStop=yes

[Service]
Type=oneshot
ExecStart=ddns

[Install]
WantedBy=timers.target
[Unit]
Description=DDNS
RefuseManualStart=no
RefuseManualStop=no
[Timer]
OnBootSec=1min
OnCalendar=*-*-* *:*/5:00
Persistent=true
RandomizedDelaySec=15
Unit=ddns.service
[Install]
WantedBy=default.targetThen, enable the timer:
$ systemctl enable --now ddns.timer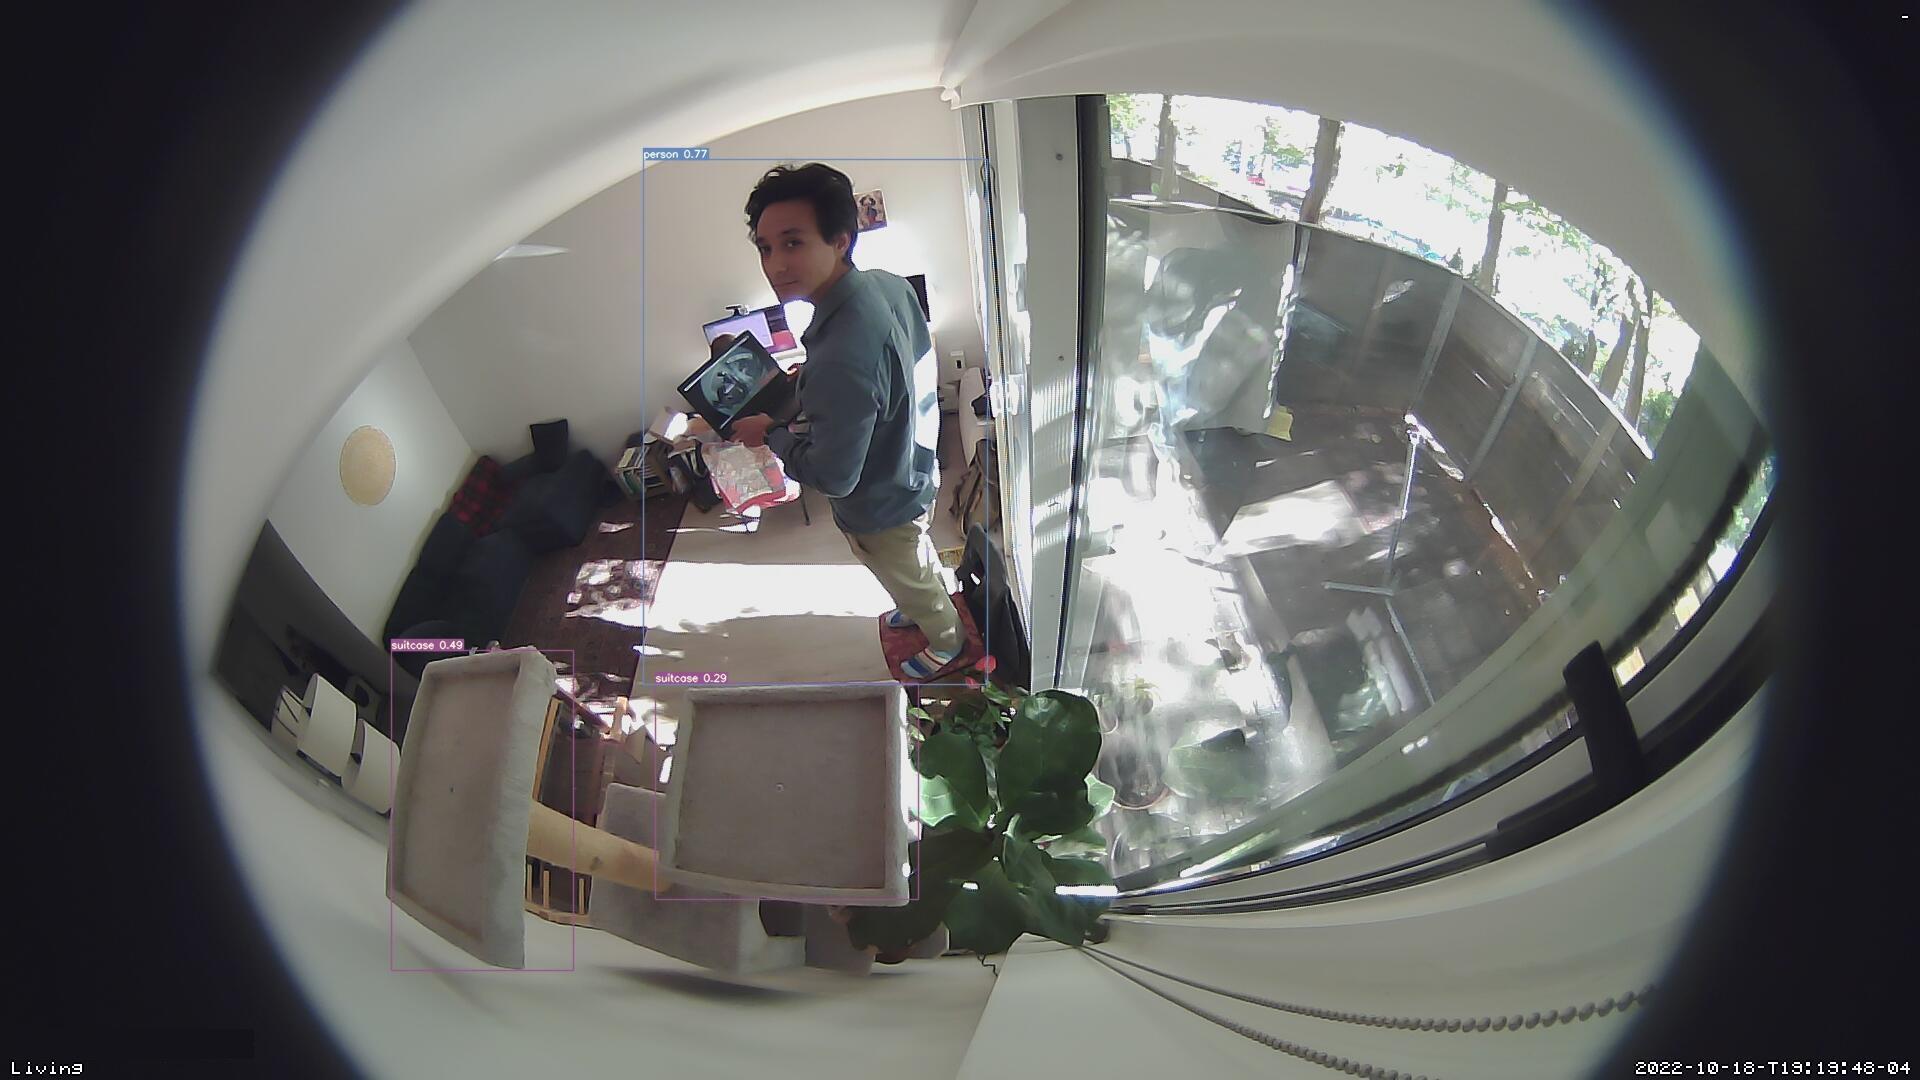
TLS Certificates
motion will need TLS certificates to encrypt the livestream,
webcontrol, and authentication for each. We can get free certificates from Let's Encrypt, using certbot. The following assumes a
dns-01
challenge with Route53.
Install certbot and the python3-certbot-dns-route53
plugin:
$ sudo apt-get install certbot python3-certbot-dns-route53
Run certbot to generate certificates:
$ sudo certbot certonly \
    --agree-tos \
    --email user@example.com \
    --non-interactive \
    --quiet \
    --verbose \
    --dns-route53 \
    -d ${DOMAIN}
Add the motion user to the ssl-cert group.
Then, change group ownership for access.
$ chown -R root:ssl-cert letsencrypt/archive/${DOMAIN}
$ chown -R root:ssl-cert letsencrypt/live/${DOMAIN}
$ chmod 440 letsencrypt/archive/${DOMAIN}/privkey1.pem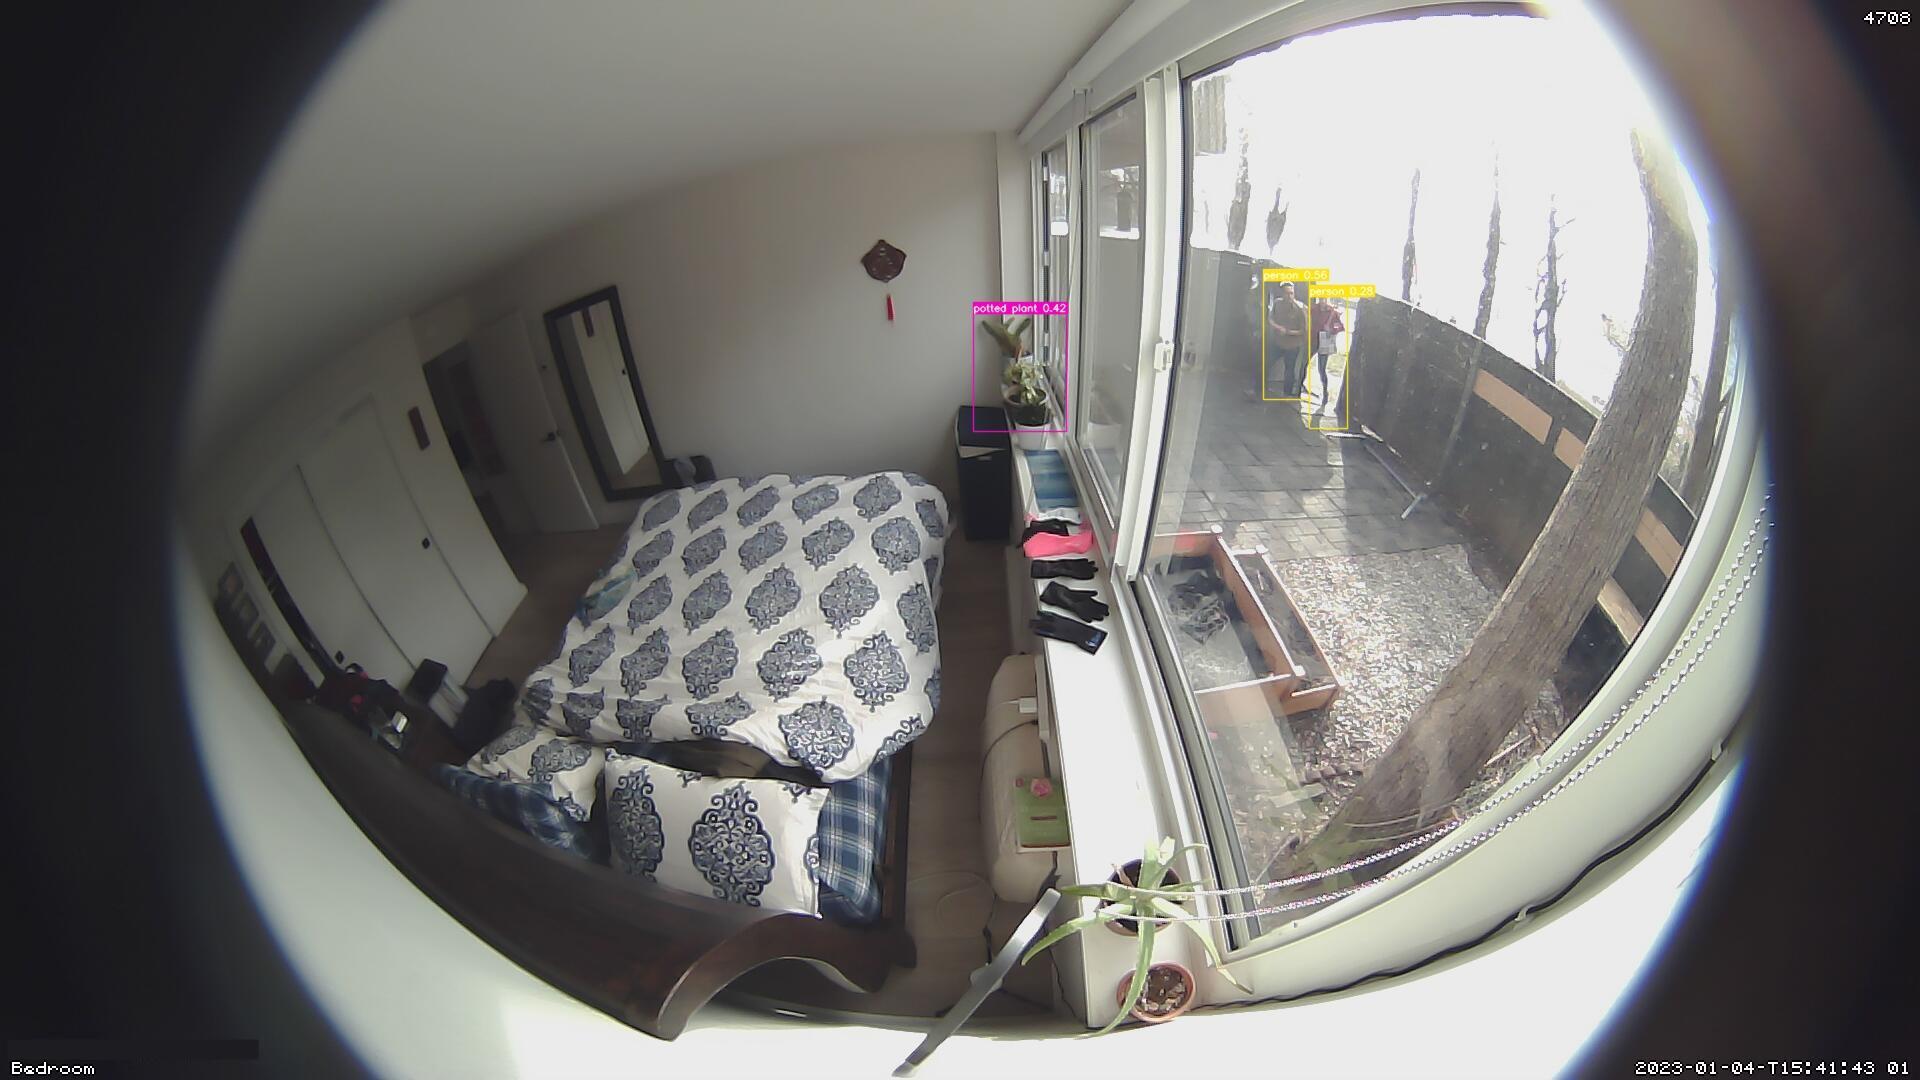
Motion Scripts
We're nearly there. Three scripts are used to tie functionality together;
they should be copied over to /var/lib/motion and made
executable by the motion user. I use a
script to make
installing the scripts a little easier.
An alert script is called when motion is detected; it sends a
notification via email.
#!/usr/bin/env bash

# Devices to check -- if populated and up, no notifications are sent.
readonly DEVICES=()
readonly RECIPIENT="${NOTIFICATION_RECIPIENT}"

check_devices() {
  for device in "${DEVICES[@]}"; do
    if ping -c 1 -w 1 "${device}" &> "/dev/null"; then
      return 0
    fi
  done

  return 255
}

main() {
  # If devices are present, don't notify.
  if (( "${#DEVICES[@]}" )); then
    if check_devices; then
      exit 0
    fi
  fi

  echo "${HOSTNAME}: motion detected at $(date '+%Y-%m-%dT%H:%M:%S%:z')." | \
    mutt -s "${HOSTNAME}: Motion Detected" \
	 -- "${RECIPIENT}"
}

main "$@"
The sync script is used to backup timelapse videos:
#!/usr/bin/env bash

readonly BUCKET="${B2_BUCKET}"

main() {
  local filepath="$1"
  local name
  name="$(basename "${filepath}")"

  backblaze-b2 upload-file \
	       --threads 2 \
	       "${BUCKET}" \
	       "${HOME}/timelapse/${name}" \
	       "${HOSTNAME}/timelapse/${name}"

  # Delete outdated files.
  # This assumes the timelapse is created on an hourly basis.
  rm -f "$1"
  find "${HOME}/timelapse/" -mmin +60 -delete
}

main "$@"
The notify script sends notifications, and backs up the
snapshots:
#!/usr/bin/env bash

# Backblaze B2 Bucket
readonly BUCKET="${B2_BUCKET}"

# Devices to check -- if populated and up, no notifications are sent.
readonly DEVICES=()

# COCO Labels
readonly LABEL_PERSON=0
readonly LABEL_CAT=15

# Lockfile to ensure that only one instance of the script is running.
readonly LOCKFILE="/tmp/motion-notify.lock.d"

# yolov7 working directory.
readonly PROJECT="/tmp/yolov7"

# Notification recipient.
readonly RECIPIENT="${NOTIFICATION_RECIPIENT}"

acquire_lock () {
  while true; do
    if mkdir "${LOCKFILE}"; then
      break;
    fi
    sleep 1
  done
}

check_devices() {
  for device in "${DEVICES[@]}"; do
    if ping -c 1 -w 1 "${device}" &> "/dev/null"; then
      return 0
    fi
  done

  return 255
}

detect_objects() {
  local filepath="$1"

  python "${HOME}/yolov7/detect.py" \
	 --exist-ok \
	 --no-trace \
	 --save-txt \
	 --project "${PROJECT}" \
	 --name "motion" \
	 --weights "${HOME}/yolov7/yolov7-tiny.pt" \
	 --source "${filepath}"
}

notify() {
  local name="$1"

  echo "${HOSTNAME} at $(date '+%Y-%m-%dT%H:%M:%S%:z')" | \
    mutt -a "${PROJECT}/motion/${name}.jpg" \
	 -s "${HOSTNAME}: Motion Detected" \
	 -- "${RECIPIENT}"
}

upload() {
  local name="$1"

  backblaze-b2 upload-file \
	       --threads 2 \
	       "${BUCKET}" \
	       "${PROJECT}/motion/${name}.jpg" \
	       "${HOSTNAME}/photo/${name}.jpg"
}

delete_outdated() {
  local filepath="$1"

  acquire_lock

  rm -f "$1"
  rm -f "${PROJECT}/motion/${name}.jpg"
  find "${HOME}/photo/" -mmin +5 -delete
  find "${PROJECT}/motion/" -iname "*.jpg" -mmin +5 -delete
  find "${PROJECT}/motion/labels/" -mmin +5 -delete

  release_lock
}

release_lock () {
  rmdir "${LOCKFILE}"
}

main() {
  local filepath="$1"
  local name
  name="$(basename "${filepath}" .jpg)"

  # If devices are present, don't notify.
  if (( "${#DEVICES[@]}" )); then
    if check_devices; then
      delete_outdated "${filepath}" "${name}"
      exit 0
    fi
  fi

  detect_objects "${filepath}"

  # Send a notification if we match any labels.
  labels="$(awk '{print $1}' "${PROJECT}/motion/labels/${name}.txt")"
  if echo "${labels}" | grep -qw "${LABEL_PERSON}\|${LABEL_CAT}"; then
    notify "${name}"
  fi

  upload "${name}"

  delete_outdated "${filepath}" "${name}"
}

main "$@"
With AWS Rekognition, you'll need to adapt the script. The following will handle uploading the image to AWS, and check if the labels are actionable:
labels="$(env aws rekognition detect-labels \
--min-confidence 90 \
--image-bytes fileb://"${filepath}" \
| jq -j '.Labels | .[] | "\n",.Name," ",.Confidence')"

if grep --quiet "Human\|Cat" <<< "${labels}"; then
  echo "${HOSTNAME} at $(date '+%Y-%m-%dT%H:%M:%S%:z')" | \
    mutt -a "${filepath}" \
	 -s "${HOSTNAME}: Motion Detected" \
	 -- "${RECIPIENT}"
fi
Motion Config
The last step is to configure motion to:
- Take snapshots on motion detection
- Capture a timelapse — one photo per second, one file per hour, synced to the Backblaze B2
- Serve webcontrol on port 8080 over HTTPS
- Livestream on port 3000 over HTTPS
- Notify on motion detection and send object-detected snapshots
- Keep minimal amounts of data on the local drive
# GENERAL
daemon off
target_dir ${MOTION_DIR}
log_file ${MOTION_LOG_FILE}

# IMAGE PROCESSING
despeckle_filter EedDl
framerate 24
text_scale 2
text_changes on
text_left %$
text_right %Y-%m-%d-T%H:%M:%S %q

# MOTION DETECTION
event_gap 1
threshold 2000

# MOVIES
movie_output off
movie_filename /video/%Y-%m-%dT%H:%M:%S-%v

# PICTURES
picture_output first
picture_filename /photo/%Y-%m-%dT%H-%M-%S_%q

# TIMELAPSE
timelapse_interval 1
timelapse_mode hourly
timelapse_fps 60
timelapse_codec mpg
timelapse_filename /timelapse/%Y-%m-%d-%H-%M-%S

# WEBCONTROL
webcontrol_auth_method 2
webcontrol_authentication ${MOTION_USER}:${MOTION_PASSWORD}
webcontrol_port ${PORT_CONTROL}
webcontrol_localhost off
webcontrol_cert ${TLS_CERT}
webcontrol_key ${TLS_KEY}
webcontrol_parms 0
webcontrol_tls on

# LIVE STREAM
stream_port ${PORT_STREAM}
stream_localhost off
stream_quality 25
stream_motion on
stream_maxrate 24
stream_auth_method 2
stream_authentication ${MOTION_USER}:${MOTION_PASSWORD}
stream_preview_method 0
stream_tls on

# SCRIPTS
on_motion_detected ${MOTION_DIR}/alert
on_movie_end ${MOTION_DIR}/sync %f
on_picture_save ${MOTION_DIR}/notify %f

# CAMERA
camera_name ${CAMERA_NAME}
videodevice /dev/video0
height 1080
width 1920
Restart motion to use the updated configuration:
$ systemctl restart motionCamera Management
I use a simple script to manage the cameras. This examples allows control over three servers (one of which has two cameras):
#!/usr/bin/env bash

readonly WEBCONTROL_PORT="${PORT_CONTROL}"

readonly cameras=(
  "https://${HOST0}:${WEBCONTROL_PORT}/0"
#  "https://${HOST0}:${WEBCONTROL_PORT}/1"
#  "https://${HOST1}:${WEBCONTROL_PORT}/${CAMERA0}"
#  "https://${HOST2}:${WEBCONTROL_PORT}/${CAMERA0}"
)
readonly auth=(
  "${MOTION_USER}:${MOTION_PASSWORD}"
#  "${USER0}:${PW0}"
#  "${USER1}:${PW1}"
#  "${USER2}:${PW2}"
)

err() {
  echo "[$(date -u +'%Y-%m-%dT%H:%M:%S%:z')]: $*" >&2
}

main() {
  local url="detection/status"

  case "$1" in
    "capture"|"c") url="detection/snapshot" ;;
    "pause"|"p") url="detection/pause" ;;
    "start"|"s") url="detection/start" ;;
    "status"|"") url="detection/status" ;;
    *) err "unrecognized command: $1"; exit 1
  esac

  for i in "${!cameras[@]}"; do
    curl --digest --user "${auth[i]}" "${cameras[i]}/${url}"
  done
}

main "$@"
Next Steps
As with all software, this project is a work-in-progress, at times abandoned, and never completed. There are a few ideas I am exploring as I continue to prototype the system:
- The most urgent task is to make it easier to set up a new server and to keep configuration consistent across servers. I'm working on minimizing some of the duplicative work. Another option is to use containers.
-
Use OpenBSD instead of Raspberry
Pi OS, replacing
msmtpwithOpenSTMTPD,acme-clientforletsencrypt. The main concern here is whether wireless andyolov7are sufficiently performant. - Use an in-memory filesystem and forgo the SSD, which might drop ~$30 from the cost of the system.
- Use different hardware — wireless or PoE security cameras with an RTSP stream and motion running on a single server.
-
Improve object detection with
yolov7by training the model. -
Develop my own Go service to replace or wrap around
motion, or replace the bash scripts with Go programs. - Add features, like two-way communication.
-
Use
yolov7to monitor the camera stream directly, and forgo the motion detection step.
The final thanks must go to the open-source contributors who have made this approach possible, from the operating system all the way up to the interpreters.